
Welcome back to our Elvenar planning series. This time, we will be focusing on creating an optimal build for the Elvenar Woodelves chapter settlement. If you haven’t done so already, go and read the original Elvenar Woodelves – Planning post that covers general planning for the chapter – all kinds of things that needs to be taken care of.
But here we are going to delve into in-depth analysis of the Woodelves guest race settlement buildout. I skirted that part in the original write up as I was starting Woodelves already, and needed a plan to begin with 😉 Now I’ve spent some time analyzing the builds and here we have some recommendations for different setups.
Good news for human players – as guest race settlements are the same for both elves and humans, most of the analysis will apply to human players as well. Just not the whole city layout 😉
Table of Contents
Intro (also TL;DR)
Alright, we’ve got quite a few calculations here. If you’re into spreadsheets and detailed analysis you’re going to like it; if not, uhm, well… OK, don’t worry, if that’s not your cup of tea, you can skip right to Build Recommendations section! You don’t need to do the whole analysis in order to benefit from its results 😉
Now, just make sure you pay attention to some of the assumptions that I am making here (and check Objectives section below). If those are quite different from your circumstances, the end results might not be applicable to you. Having said that, I am pretty sure that in most cases it would work fine for most players.
So let’s go and figure out that optimal build for Woodelves in Elvenar!
Objectives
So where to start? Obviously, from the beginning 😉 As in what is it what we’re trying to accomplish here?
I have briefly mentioned it before – our Elvenar gaming focuses on the fastest progression while still being a free player. So our strategies and builds are optimized for that. But if your objectives are different (esthetics, rank, compactness etc) our strategies might not be optimal for you!
Chapter Requirements Analysis
So let’s take a look at what is required to complete the chapter. At the top level, it is two things – KPs to complete research items, and resources that are needed to activate them.
KP Requirements
So let’s take a look at KP requirements first, shall we?
KP Rate as Progression Limit
So with the disclaimer on different objectives out of the way, what does it mean – the fastest progression? In this context, this basically means that your limiting factor is KP accumulation over time. Once you account for all KP sources – hourly KPs, tournament rewards, map encounters, some special buildings and AWs, crafting – you realize that there are only so many KPs you can acquire daily. Most of these sources are pretty inflexible and/or don’t move the needle.
KP sources
- Base KPs: rate is fixed
- Map Encounters: there are only so many provinces that you can scout, long scouting times become a pretty hard constraint
- Special Buildings: these are relatively rare (Carting Libraries, Wishing Wells, some set buildings), and don’t generate as much per day. I suppose one can try to mass spam Carting Libraries, but you can’t easily get them nowadays.
- Ancient Wonders: Tome of Secrets produces 1KP per 5 levels. This is not going to move the needle much (and you’re not maxing out the ToS, are you? 😉 )
- Crafting: you’ll run out of spell fragments and/or catalysts way before this would matter.
This leaves tournaments as the only source of KPs that is relatively flexible and significant. Well, I am already doing 3.5K+ points every tournament on a sustainable basis, and focus on KPs (and that’s incorporated in the analysis). That’s pretty high number (usually, top 20-40 on the server). It is possible to do more, but not by much (as a free player). And you’ll likely need to focus more on military / goods production, and that will take away from other things that impact progression – in particular, space for guest race settlements.
No tech lock!
So KP accumulation is always limited. As research progress through the chapter requires KPs, there is a pace at what you won’t be able to move faster no matter what else you do. You’ll be just waiting for KPs to accumulate. So our playing of Elvenar is driven by a principle that KP accumulation (close to maximum possible at that) should be the only limiting factor of progression. No other bottlenecks!
This also effectively equivalent to saying that there should be no tech lock at any time (i.e. all the generated KPs are dumped into research, and no KPs are wasted while maxed out on KP bar or spent on AWs).
KP Rate Projections
So what is that projected KP rate? All players are different, and you can calculate your own. Don’t try to do it on the daily basis, you’ll likely underestimate it as many inflows are not regular. The right way to do it is to take one whole chapter that you managed to complete without any tech lock, and divide the total KP amount spent on research by the number of days that it did take to complete that chapter. You’ll get pretty decent estimate of what you average daily KP accumulation rate is.
Most chapters need about 2,000 KPs to complete, and I have done several previous ones in about a month each. This gives me my projected KP accumulation rate of ~60KP / day. This sounds high, but is actually pretty consistent (and accurate). I may write a separate post on how you can actually get 60KP a day on average. Remember “on average” part 😉
Research Summary
So let’s take a look at the research summary table:
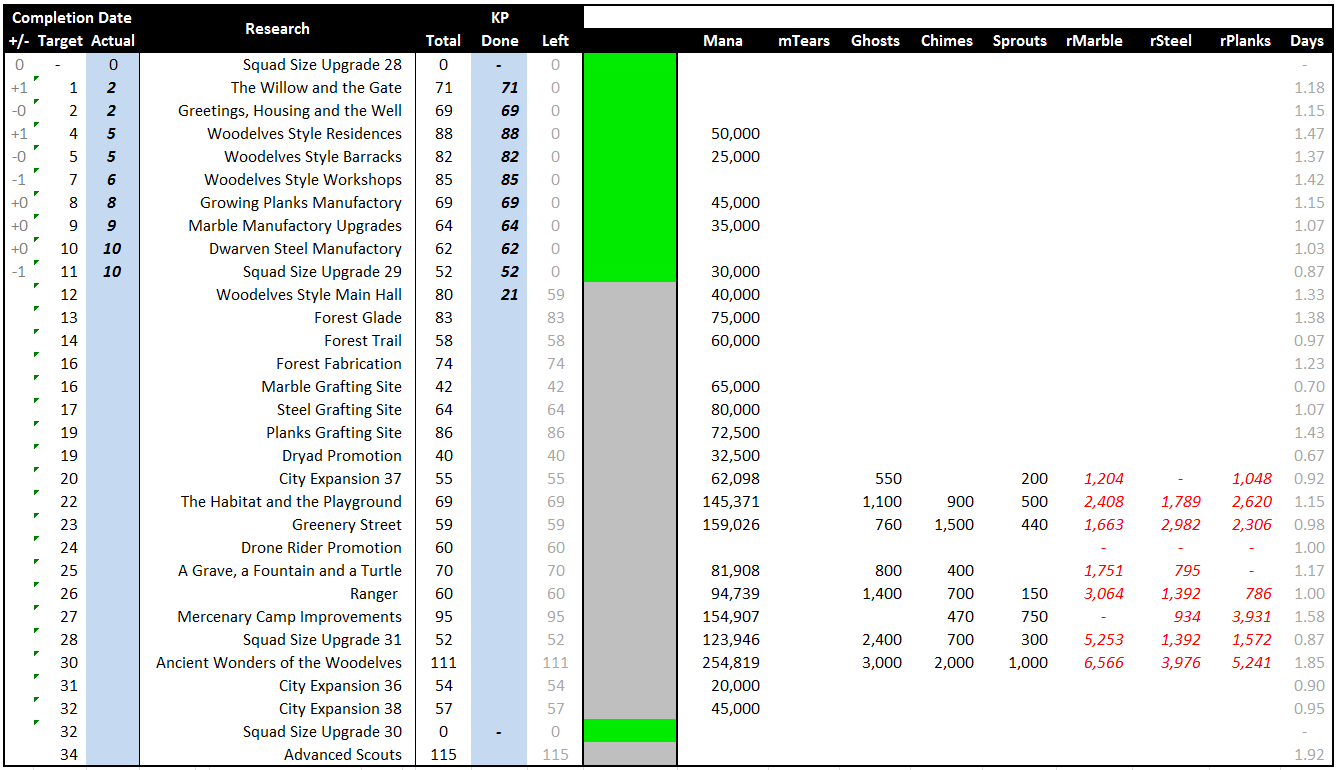
Here you can see all the research items from the Woodelves chapter – this one is as of around Day 10. You can see total KP requirements, how much is already done and is how much is left. Green indicator shows activated research. Lets ignore resource requirements on the right for now.
Completion Dates
Left columns deal with completion dates. The target column shows expected day on when a particular research is expected to be completed. It uses KP requirements up to that point and divides it by the projected KP accumulation rate (so 60KP/day in my case). Actual shows the actual day when the research was activated, and +/- columns shows the difference actual vs target (negative is being ahead of schedule). As you can see, for the first 9 days I’ve been right on target! Actually, my realized KP rate was 62 KP/day, which is basically spot on to the projected 60.
The future research order is not cast in stone, and some things can be moved around. E.g. some dead-end city expansion techs may move up when I need a KP sink (or actual space). You may also notice that Squad Size upgrade 28 and 30 show zero KP requirements. These are optional SS upgrades, and I skip all of those to reduce tournament losses. So I will not be taking any of those.
Chapter Completion Target
Now, you can see that with 60KP/day accumulation, this chapter can be completed end-to-end in about 34 days. You can only go faster if you increase your accumulation rate (or do some things that require diamonds 😉 )! As I mentioned above, increasing rate above 60 is difficult. The actual rate might be somewhat different still – higher or lower, so those dates can still move. But so far, it looks pretty accurate.
Resource Requirements
Now KP accumulation is important, but you won’t progress far if you don’t have sufficient resources to activate completed research. So now we get back to our planning goal. We can see that KP-wise, we can hit the end of the chapter in 34 days. We need to design a plan that would allow us to achieve that number (remember, this is a lower boundary, we have other potential constraints).
Research Resource Requirements
So the other obvious constraint is tech unlocking requirements, and you can see these in the same table above on the right side. Now, you may not recognize some of the numbers, as these are different comparing to the ones you see on the research tab. That’s because in the table I include requirements to produce all the inputs. For instance, Ancient Wonders of the Woodelves research is displayed with requirements of 100K mana and 3K/2K/1K of portal goods to activate. However, production of these portal goods requires production of refined goods first, as well as non-trivial mana requirements (actually, higher than direct costs).
If we add all these direct and indirect activation costs, we can get a summary of all the requirements that are needed to complete all the chapter research.
Build/Upgrade Resource Requirements
But this is not all. We also need to take into consideration costs of building and upgrading guest race facilities – portal (Forest Glade), Forest Fabrications (for mana tears, ghosts, chimes and sprouts) and Grafting Sites (for refined T1 goods).
Now these build/upgrade requirements are tricky. Research requirements are simple – outside of a couple of optional techs, these are fixed and are known ahead of time. No decisions that you make impact that. Upgrade requirements are different as you determine how many facilities of which type you’re going to build, and how much do you want to upgrade these. We’ll get to that point later.
For now lets just say that we have a particular target settlement build, and for that you can calculate requirements. By the way, when talking about requirements we always talk about special goods only – the assumptions is that coins/supplies/regular goods are not a constraint, and are easily available. Make sure it is so! You don’t want to choke on a build because you run out of T3 goods 😉 If you’re following optimized strategies, this should never be an issue.
Alright, so we’ve got to a point that for a particular settlement build we have all the requirements for the chapter – everything that needs to be produced in order to finish that chapter. So now we need to make sure that these amounts can be produced in the same time (or faster!) that takes for all the KPs to accumulate. Easy, right? 😉
Resource Production Groups
So we can split resource requirements into 3 parts, as different buildings are responsible for different resources:
- Mana
- As you can see, mana requirements are massive. You also can both produce and consume it almost from the beginning of the chapter, so these requirements can be spread out throughout the whole chapter.
- Mana Tears, Ghosts, Chimes and Sprouts
- These are products of Forest Fabrications. As you only get access to Forest Fabrication research around day 16, you have less than 20 days to complete all the productions from these facilities.
- Refined marble, steel and planks
- These are products of Grafting Sites. There are actually separate buildings, but we’ll see what the appropriate setup is. As you only get access to them around day 17-18, you have less than 16 days to complete productions from these facilities.
These are some approximated numbers, and we’ll look into these more.
Production Boosts
So before we go further, let’s talk about production boosts. There are several kinds: portal upgrades, facility upgrades and Blooming Trader Guild AW. Portal upgrades and BTG are different from the facility upgrades, and not just because they apply to all the buildings! Facility upgrades only improve space efficiency, but not the input efficiency. Portal and BTG do both!
Let me illustrate. Let’s say a production facility needs 400 units of input material and produces 200 units of output as the base rate (e.g. L1, no other boosts). If you upgrade it to L3 (e.g. 100% boost), the facility will produce 400 units of output, but will also require 800 units of input. In other words, L3 facility is exactly the same as 2x L1 facilities in the same space.
Now let’s instead imagine that we have the same 100% boost from portal and BTG (artificial example as this will need portal L4 and BTG L30). Now the L1 facility produces the same 400 units of output, but it only needs the same 400 units of input comparing to L3! This setup is twice as efficient in terms of inputs.
Why Boost Matters
Now that doesn’t matter much as long as inputs are abundant (coins/supplies/regular goods/etc). Where it becomes important is where inputs are also manufactured settlement goods, and as such are scarce resources. Having max portal / BTG boosts effectively reduces the amount of primary input goods required. This drops requirements on the production facilities for the input goods! Suffice to say, that common wisdom of upgrading portal to the max first and ASAP is well warranted for setups with dependent productions.
Boost Impact on Requirements
What it also means that in order to calculate requirements for input goods (refined T1 in this case), we need to project our portal and BTG boosts that will be in effect. Well, we know that we always need to upgrade portal to L4 regardless (because the last research needs the amounts that can only be held in maxed out portal). Usually, this upgrade is gradual so you don’t get the max boost all the time. However, most of the production time portal will be at L4. I also have an idea of fast forwarding portal upgrades using portal profit spells. I believe this would be an excellent value for my setup (more on that later).
So all in all, the boost value that I used for all calculations is 166%. This is 60% from maxed L4 portal, and extra 6% for L1 BTG. Unless you have upgraded your BTG quite a bit, you can ignore its effect.
Settlement Buildings Analysis
Alright, so we’ve got all the resource production requirements, but how are we going to fulfill those? That’s right, we need to build settlement production facilities!
Grafting Sites
So let’s look at the grafting sites as these have simple input requirements for production (T1 goods only, which we assume are plentiful). The research for all 3 is really close together, so we will ignore the fact that we won’t be getting all 3 at exactly the .same time.
And as in all economics, we need to look at both supply and demand. So let’s go!
Refined Goods Demand
Grafting Sites produce refined goods, so let’s start with demand requirements for that.
Research Refined Goods Demands
First, let’s look at the totals of refined goods required for all the research (let’s ignore upgrades for now):

Now, it stands to reason that the optimal manufacturing of refined goods is the one where all 3 sets of grafting sites use all available time to do so. If some grafting sites can complete the job faster, they will idle for some time. Which means we could have used less of those sites and have a smaller footprint (so that we can use the space for something else). This model ignores the fact that units here are discrete (you can’t reduce number of sites by 0.3, for instance), but it doesn’t change the substance.
Demand Ratios for Refined Goods
So with that, we expect to have roughly the same amount of time available to produce all 3 sets of refined goods. Now we can normalize these amount to come up with the necessary ratios for production rates. As the required amounts are about 22K/13K/18K, the demands ratios are as following:
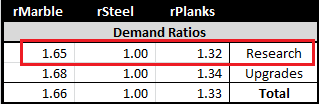
In other words, for each 1 unit of refined steel we need to produce 1.65 units of refined marble and 1.32 units of refined planks. If you don’t like fractions (e.g. 1.65:1.00:1.32), this is basically the same as 5:3:4 ratio 😉
OK, so this is for only research, but what about upgrades? Forest Fabrications upgrades require refined goods directly, and Forest Glade upgrades need ghosts/chimes/sprouts, which also need refined goods. Well, luckily for us, Inno decided not to mess around with us here 😉 In fact, all the upgrade requirements – no matter which combination of units and levels – still require refined goods in 5:3:4 ratio. I’ll leave this as an exercise to the readers to double check. But for my particular upgrade setup you can see demand ratios for upgrade, and they match (see lines for Upgrades and Totals).
Refined Goods Supply
Alright, we’re getting somewhere! So no matter what buildout we’re pursuing, total demands rates for refined goods follows 5:3:4 ratio. Awesome. So now let’s look at the supply side for refined goods:

So there are four parts here:
- Base output amounts per 3 hour cycle (no boosts in place).
- We assume that you run the shortest cycles as these are the most efficient
- Boosted output amounts per 3 hour cycle
- Boost is 166% in our case
- Boosted output per day
- Here we need to make another assumption, and that is how many 3 hours collections per day can you make. I used 6 for the calculations. I can probably do slightly better than that, but most people will find 6 to be about the maximum (but doable)
- The last piece is the daily production from all the grafting sites
- This requires input of how many of each site we’re going to build. We’ll get back to that in a bit
Supply Ratios for Refined Goods
And just like with the demand ratios, we can calculate supply ratios for the grafting sites. Note, that while output changes with boosts, the ratios do not (boost applies to all facilities in the same way):
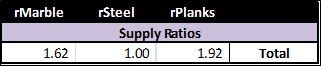
Alright, so we’ve got to the supply ratios for individual sites of 1.62:1.00:1.92, which is close enough to 5:3:6. Awesome! So what’s next?
Matching Supply with Demand
So what we really want is to match daily demand and supply ratios.This means that all 3 refined goods will be produced in the same amount of time, as demand and supply rate matches.
But right now it doesn’t (5:3:4 vs 5:3:6) – what a bummer! But we still have some parameters that we can adjust, and that is a number of individual sites. Basically, if we would have the same number of sites (1:1:1 ratio) this is what would happen:
- Marble and steel would be balanced. While steel would produce 3 units, marble would produce 5 units. In the same amount of time their demands would also be 5:3.
- But we would overproduce planks by 50%! The same time period would only require 4 plank units, but we will produce 6. Not good!
So you can see how we can deal with that to make it balanced. We need to divide demand by supply ratios, and that would give us target ratio for the number of sites! Like this:
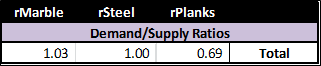
So to keep rates of production matching the demand, we need to build marble/steel/planks grafting sites at 1.03:1.00:0.69 ratio. Or, in other words, 3:3:2.
Balanced Grafting Site Builds
Now, we don’t know yet what the total number of the grafting sites needs to be (it depends, more on that later), but we always want to build them in 3:3:2 ratio. Or as close as we can get. So the following would be good fits:
- 3:3:2
- 6:6:4
- 9:9:6
You can do some interpolated setups like 7:7:5 if you want something in between. But keep in mind that you’re creating a mismatch in rates, so some of the facilities will finish earlier than others, an will be idle. Or you can see the other way, that some will be slower, and will hold others back. So target setup for 7 steel is about 7.0:7.0:4.7; with 5 planks this means you’re overproducing planks by a little bit. Or you can look at this like deviation from 7.5:7.5:5.0, meaning there is not enough marble and steel for 5 planks.
This is not necessarily bad if you unlock planks a bit later (a fact that we chose to ignore). So if you take number of plank grafting sites as a base, here are the good setups for all three:
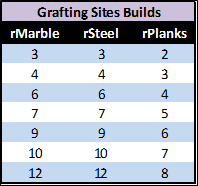
Inno is giving us plenty of indications that 3:3:2 is the right setup. Take a look at both mana tears costs (2K:2K:3K) and space (6:6:9) – they all follow the inverted 3:3:2 pattern. So if you build with this ratio not only your production rates would be consistent with demand, but both space and mana tears cost would be the same for each type.
Forest Fabrications
Alright, so we’re almost done with the grafting sites, but we need a few pieces from the rest of the build. So we’ll get back to that later. For now, let’s switch to Forest Fabrications. These are more complex facilities as they take other guest race goods as an input (refined T1), produce some of the goods that are needed for builds/upgrades (mana tears), and themselves can have different upgrade levels.
Forest Fabrications Production
So let’s look at some basic production data for the Forest Fabrications:
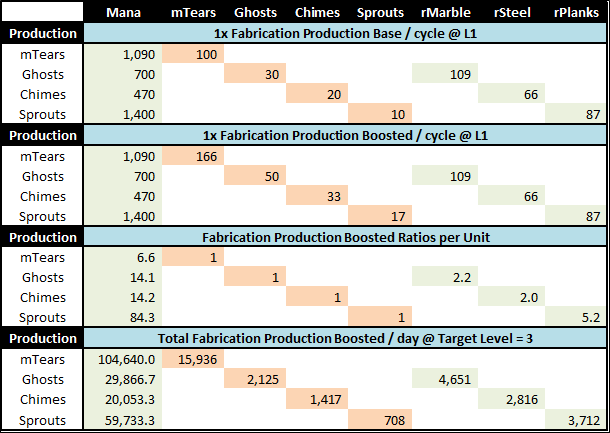
Similarly to the grafting sites, there are four parts:
- Base output amounts per cycle for L1 (no boosts in place).
- That would be 3 hour cycles for mana tears, and 9 hour cycles for portal goods
- Boosted output amounts per cycle for L1
- Boost is 166% in our case
- Boosted input requirements per unit of production
- You can read it as following: 1 unit of ghosts requires 2.2 units of refined marble and 14.1 units of mana. Remember, these numbers depend on your portal and BTG boost!
- The last piece is the daily production from all the forest fabrications
- This requires input of how many fabrications we’re going to build, and the level we’re going to upgrade these to
- This particular table shows it for 8 FFs upgraded to L3
The last piece – conversion to total daily numbers comes from these tables given a target upgrade level:
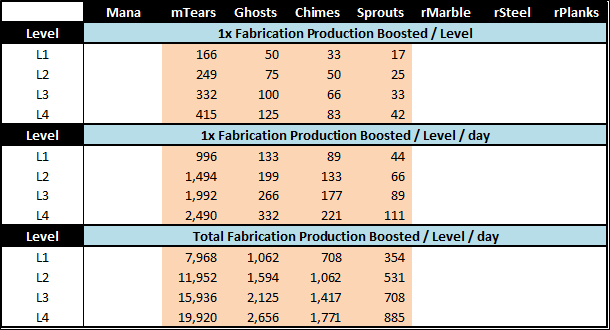
We make the same assumptions on number of collections for mana tears (3 hour cycles = 6 collections / day), but for 9 hours cycles for the rest of the goods the assumption that you can keep it going basically non-stop. This is not a conservative assumption, but should be close enough 😉
Total Build/Upgrade Requirements
So now we can total out all upgrade requirements, given a particular settlement build. For instance, for L4 Forest Glade, 8 L3 Fabrications and 9/9/6 Grafting Sites it looks like this:
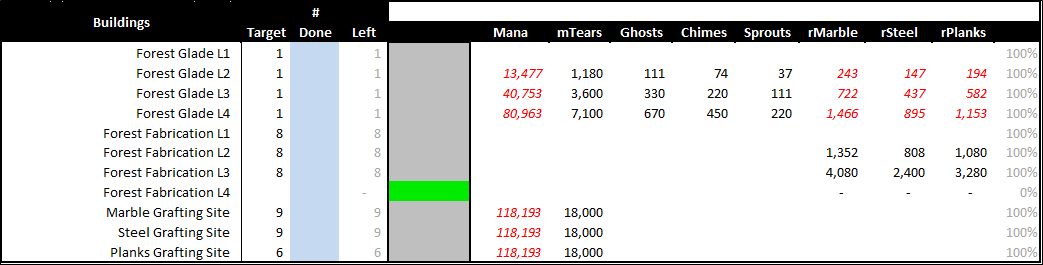
Now we can go back and add research and build/upgrade requirements together, and we can get total production requirements for the chapter. As we calculated total rates of production before, we can find out how many days would that take to produce all the required amounts (see the Days line). TaDa!

Now, mana tears, ghosts, chimes and sprouts are all produced in the same facilities – forest fabrications. So we need to add all those days up, to get production time for the fabrications complex.In the 8L3/9/9/6 example that would be 4.1+5.2+5.2+5.2 = 19.8 days.
Optimal Build Construction
So lets ignore mana for a bit, and get back to answering the question on what is the most efficient / optimal build for Woodelves in Elvenar. We’ve established a model on how for any build combination we can get corresponding number of production days. But what’s the best build?
So let’s do some simulation here! This is a fancy way of saying let’s try a few different options and see how they look like 😉 But before we go there, let’s think about general dynamic of the build.
General Build Dynamic
What would happen if you keep your fabrications setup constant, but start to increase number of grafting sites (in 3:3:2 ratio)? GS production time will go down (more producers for the same amount of goods), but FF production time will go up (you need more mana tears to be produced with the same number of FF). Decrease works in symmetrical fashion.
Now if you keep number of grafting sites constant, and start to increase number of FFs or their upgrade level? Now your FF production time will go down, but GS production time will go up (more FF upgrades require more refined goods). The only exception to that if you’re adding L1 FFs only – but that would be very expensive from the space perspective.
Now, think about that you’re only done with production when both FF and GS complexes are done. Basically, you’re only as fast as your slowest production here. Intuitively, this means that the optimal production is when both groups produce all the requirements in about the same amount of time. A small twist is that we unlock FFs earlier in the research tree, so we have a couple of days more for FF production.
Production Time Simulation
Alright, now that we’ve figured the dynamics of the build, let’s try different combinations and see what kind of times we can achieve! We’ll go with 3 primary grafting sites builds: 3/3/2, 6/6/4 and 9/9/6, and will see how different combinations of numbers and upgrade levels for FFs impact production times. So here we go (numbers are production time in days):
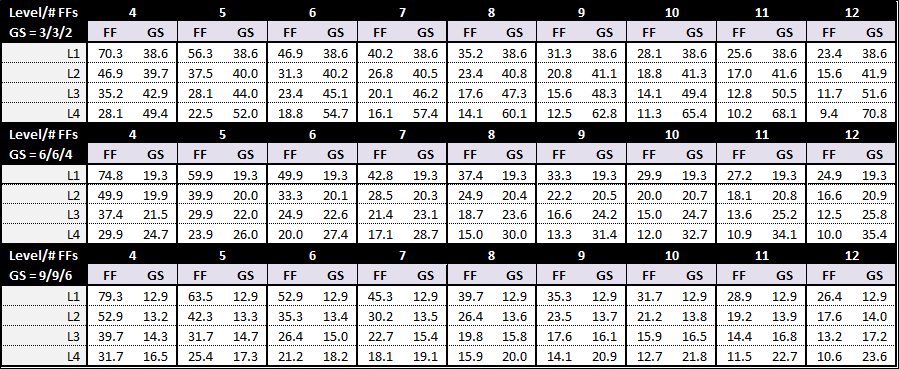
Now, we just need to aggregate these results. As I mentioned, it’s the slowest time of the two that matters – so let’s look at that. I add a couple of days to GS production as it starts later, to keep numbers consistent. The result can be interpreted as number of days needed for production after forest fabrication research is unlocked. Without further ado, here we go:
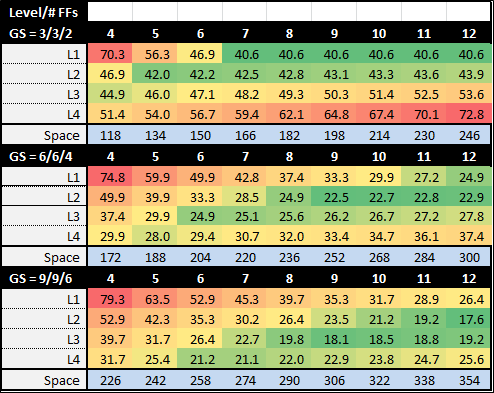
Wohoo! Pretty colors! 😉 We’re almost there. Remember, these production times are after forest fabrication research is activated, which would take about 16 days at 60 KP/ day. So you can see that no matter what you do, 3/3/2 grafting site setup would take you a least 40 days in production (so almost 2 months in total). If you go up to 6/6/4, you can cut production down to 22 days. And 9/9/6 setup can get you below 18 days!
Not So Fast!
So why wouldn’t we always go for the fastest option then? The answer is right there in the table, in the last line. Faster setups need more space. A lot more! Space here is calculated as purely building space, so no roads and portal are included. So you can see that you can do 4L3/3/3/2 build in 118 squares for facilities, and it would get you 45 production days.12L2/9/9/6 build is almost 2.5 times faster at 18 days, but its facilities take almost 3 times the space!
Space Utilization
So look at the charts of production times for optimal builds for each grafting site setup vs facilities space:
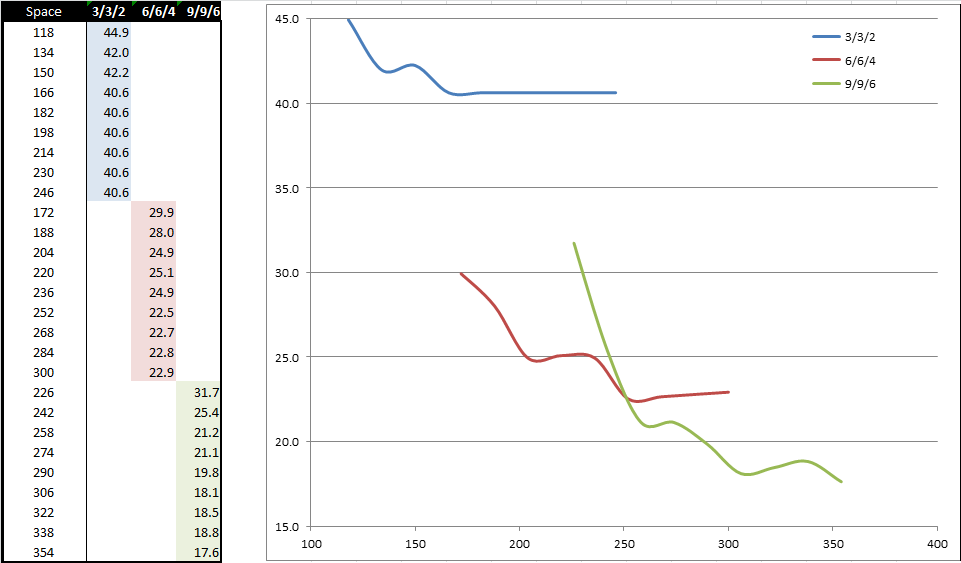
Actually this is pretty much our answer to the question of what is the optimal build for Woodelves in Elvenar. Even though it may not look that obvious 😉
Build Recommendations
Based on all this analysis, we can finally come up with some build recommendations. And ultimately, the optimal build will depend on how much space you can dedicate to the Elvenar Woodelves settlement. The more space you can free up, the faster you can complete the chapter from the production perspective. Remember, number of squares here doesn’t include portal and roads – only production facilities. Number of days is just production days, so add about 15 days for the chapter completion times.
So here we go:
100-150 squares – 40-45 days
You’re really tight on space. Are you sure you can’t afford more? You should be able to. If not, go for minimal builds with 3/3/2 grafting sites, and 4 L3 fabrications (118 squares) or 5 L2 fabrications. Remember, it will take you forever to get through this chapter! About 2 months in total.
150-175 squares – 35 days
You can go with interpolated build of 5L3/4/4/3. This will give you 35 days in 155 squares.
175-205 squares – 25-30 days
You have mostly adequate space, and can be pretty efficient. Switch to 6/6/4 grafting sites setup, and go L4 upgrades if you can only squeeze in 4-5 FFs (28-30 days at less than 190 squares), or stop at L3 if you can do 6 FF (25 days at 204 squares). You don’t really benefit from adding 7th or 8th FF to this setup. This is a very common build, and is indeed a pretty good all-rounder.
240-260 squares – 21-22 days
So you want to go faster? You need to step up from 6/6/4 grafting sites setup. Go with 7/7/5 and do 7 L3 fabrications at 241 squares. Or go to full 9/9/6 GS, and max out 6 FFs at L4. However, at 258 squares, this makes you only marginally faster.
290 to infinity – less than 20 days
So you want to go warp speed all day every day? Do you have loads of space to back it up? If yes, we can still do better. Go 8x FF at L3 and 9/9/6 GS, and you break 20 days at 290 squares. If you add one more FF (so 9x FF L3), you can do 18 days in 306 squares. Going much faster might not be realistic – production times start to taper out, and even massive expansion doesn’t get you much more. Also, we’re approaching the limits of our modeling. A lot of the assumptions that were reasonable might no longer be. E.g. we ignored build and upgrade times; when you have dozens of facilities, this might no longer be reasonable.
More importantly, do you need to go faster, really? Remember where we started – you can only go as fast as your tightest constraint will allow you. And in the beginning we estimated our KP progression. Wait, so it doesn’t make sense to drop below 20 days because you can’t accumulate KPs that fast! You will be just waiting for KPs instead of production!
What About Mana?
But wait, there is more! You didn’t think that’s all there is to it? 😉 There is one other constraint that we mentioned, but didn’t look into – mana. Remember that our progress ultimately is limited by our tightest constraint? Well, make sure it is not mana. Because you will need a ton of mana generation! This is more difficult to analyze from the build perspective as there are different ways of producing mana (it’s not just Weeping Willows), but you need to look at overall daily mana generation rate, and make sure it is adequate.
Mana Requirements
If you remember table with overall requirements for the chapter, you can see total mana demands:

It does differ depending on what your build is, but not by much. Bottom line, you will need between 2.0-2.2mm worth of mana (this does not even include Main Hall upgrades and daily decay). So if we assume 2.2mm overall mana requirements, let’s see what the daily rate needs to be:
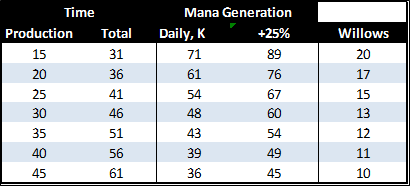
Basically, we used the same production time numbers consistent with analysis above, convert it to total time by adding about 16 (that’s where production can start, according to my KP projections), and divide total mana by total time (as we can start producing mana early on). Sounds good, right?
Well, this rate might work on paper, but not in reality. You don’t produce with that rate from the very beginning, your mana requirements are not uniform, there is no adjustment for decay etc. Basically, I’d add at least 25% to get mana rate that would be reasonable (and you can see willow equivalent of that on the right).
That’s a lot of Mana!
Ouch! So that’s a lot! Indeed it is. So before you vastly expand your settlement trying to speed up your progress, make sure that you can sustain corresponding mana generation rate.
It turns out that 14 Willows that I though would be more than enough are not really sufficient for my pace of progress. But I have means to dramatically improve my mana production without spending any more space. Tune into daily progress reports, and you will find out how! 😉
Optimal Build Layout
So there you have it. Based on your own circumstances and preferences, you can pick a build that you want to implement. For me, my KP projections indicated that I need production times of about 20 days in order not to be tech locked. There is no benefit of producing faster for me!
With that, I will be aiming for a setup with the smallest footprint that will allow me to achieve that. It’s 8x Forest Fabrications upgraded to L3, and 9/9/6 setup for Grafting Sites. I have space for that build, here is my new target layout:

The bottom row of Weeping Willows will be filled in as new expansions become available. It is quite likely I won’t have all of them.
Troubleshooting
So what if things don’t go exactly according to the plan? Let’s say some of the assumptions were too relaxed, you didn’t quite hit your collection frequency etc? Basically, you’re somewhat behind in your Elvenar Woodelves optimal build, and you’re getting into a tech lock territory?
Well, before doing anything else, see if you have any tech open where you can dump your KPs. That’s where your dead-end research such as optional expansions come in handy if you can afford to wait. But if this avenue is no longer available, then you have the ultimate weapon in smoothing settlement production issues. What is that, you say? 😉
That’s Portal Profit instants! Make sure you keep these in reserve just for these occasions and use it strategically. Don’t use them when you can accomplish the same thing with planning and regular production. But for the cases when you need to get you though a tight spot these are perfect.
Also, use them when doing initial construction/upgrade to the target build! You know that doing your upgrades first makes you better off overall, but that means you get stuck in the beginning as you’re bumping into some research. Or you slow down your upgrades in order to produce some research goods. That’s a perfect opportunity to use those Portal Profits!
Final Words
So take a look at space that you have available (or can free up), and see what you can squeeze in there, based on optimal builds that are outlined here. Different players have vastly different setups in their cities, so layouts might be quite different.
And make sure that your mana production is up to par. First half of the chapter may lull you into false sense of security when mana demands are modest. It will ramp up once you move into production phase! This is especially true for mana tears production when you’re building your grafting sites. Especially if you’re building a large settlement!
Good luck in implementing build for Woodelves in Elvenar that is optimal for you!

![Read more about the article Elvenar Woodelves – Day 09 [29%]](https://minmaxgame.com/wp-content/uploads/2019/03/WoodelvesFeaturedD09.webp)
![Read more about the article Elvenar Woodelves – Day 29 [84%]](https://minmaxgame.com/wp-content/uploads/2019/03/WoodelvesFeaturedD29.webp)

![Read more about the article Elvenar Woodelves – Day 16 [52%]](https://minmaxgame.com/wp-content/uploads/2019/03/WoodelvesFeaturedD16.webp)
![Read more about the article Elvenar Sorcerers & Dragons – Day 06 [23%]](https://minmaxgame.com/wp-content/uploads/2019/04/SDFeaturedD06.webp)

Excellent analysis.
One tip I give everyone entering chapter 9: if the first event after you start woodelves offers a mana building as a daily reward(they usually do) it can be twice as efficient as a willow meaning that a dozen of them would have a massive impact on your progression.
That’s a great point. In fact, if you can snatch a great event set even before Woodelves – and you have access to Royal Restoration spells – it might be worth doing so. You can see that in my layout I have a whole bottom left corner dedicated to Winter Market set, with 3x Winter Frost Christmas Trees. Each tree can produce ~20K mana/day in Woodelves, so it replaces about 4.5 Willows (and the same number of expansions!). I am converting my blueprints to RR as quickly as I can 😉
Wow, just wow! Thank you for all the work you put into the research for this document and the first one you created for Woodelves.
Unfortunately for me, I’m not at Woodelves yet. I’m stuck in the land of Orcs & Goblins.
I came across your site when searching for an answer to how much culture is optimal
Thanks for your feedback! If you want to look at some Orcs information, I had the last part of my playthrough documented here: https://minmaxgame.com/tag/orcs/. If you click on the layouts it will take you to ElvenArchitect, and you can see pop/culture numbers there.
.
There are different ways to play the culture game, but I found that I would normally run with the bare minimal culture (just enough to hit 100%), and sometimes even dip into negative territory. I found that for me, extra space that you need to dedicate to culture is not worth the bonuses. If you focus on high-performance culture/pop hybrids from the events to provide the bulk of your pop, then culture aspect will take care of itself.
.
Also, in the late game when I also focused on other event buildings that would be alternative to regular production buildings – but without culture or pop requirements. This really pushed excess culture high, even though I really don’t have any dedicated culture buildings.
Thank you so much for all your efforts!! I am fighting with myself right now ‘which cult/pop bldgs’ to delete or store now that we have that nice Teleport Building spell (IMHO the 1 good reward from the spire).
I had set out trying to make space for 5 rally points, I have 2 not sure I’ll get to 5. I’ll have to see how this goes.
Enjoy and thank you again,
Lisa (aka GypsyLisa on Elvenar my main world now is on Winyandor)
I did take a look at your city – it looks good, you’re on the right track. I wouldn’t recommend using Teleports that early in the game (just hoard them for later) – unless a building is truly special. Most of the pop/culture buildings are not – Venar’s Rocks might be an exception, but even then it would take a lot of effort to carry it through the chapters with a ton of Royal Restoration spells, so not sure if it’s worth it. That early teleports are probably only useful for set buildings that you intend to carry and upgrade for a long, long time.
.
Otherwise, it is much cheaper just to get up-to-date buildings from new events. Again, most of the buildings from Orcs and earlier will be obsolete very soon. I wouldn’t spend too much time thinking about what to keep – these are all expendable at this point in the game. If you want to really fly through the Orcs you may consider going deep into negative culture and/or pop. It is somewhat scary the first time; you won’t be able to do much construction in the city (you may upgrade what you want/can first), but you can release a TON of space, and really ramp up your settlement. Doing Orcs in a month is entirely doable without paying and even without Portal Profits.
.
Good luck!
Thank you for taking the time to look, I truly appreciate. Yes, I’ve been tying myself in knots on excel trying to figure out the best balance of pop/cult, etc. and not moving ahead. lol
I think I need to cut my losses and dive in. I do have 1 set that I want to add and that would be the carnival set due to the payoff. lol 😉
Again thank you so much for your website, knowledge and looking at my city,
Lisa
“So there you have it. Based on your own circumstances and preferences, you can pick a build that you want to implement. For me, my KP projections indicated that I need production times of about 20 days in order not to be tech locked. There is no benefit of producing faster for me!
With that, I will be aiming for a setup with the smallest footprint that will allow me to achieve that. It’s 8x Forest Fabrications upgraded to L3, and 9/9/6 setup for Grafting Sites.”
OMG you really did an analysis based on how to build Elvenar Buildings right? I mean, this is an great article. I think it took a lot of time for you to actually take count of all that. I’ve been trying to create the best city in the entire kingdom but you know, that’s an ambition that takes time.
However, this article gave me a really good insight to what I have to do in order to get it. Thanks!!